Share
Pin
Tweet
Send
Share
Send
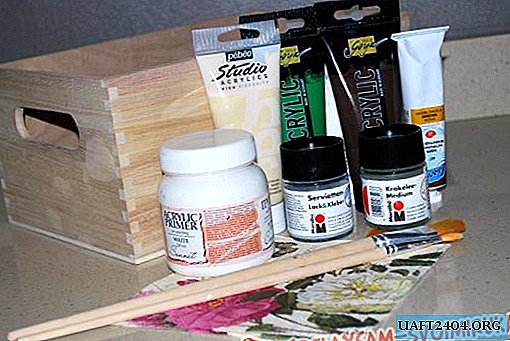
For this we need:
- wooden blank
- napkin,
- art acrylic primer
- acrylic paints for creativity (white, ivory, green (green foliage),
- bitumen,
- PVA stationery glue (or acrylic varnish),
- paraffin candle
- varnish for one-step craquelure,
- acrylic varnish for finishing the product,
- brushes, foam sponges, sandpaper.
Before proceeding with decorating, it is necessary to sand all roughnesses and roughness with sandpaper to smoothness. We cover our workpiece with soil and after complete drying, sanded again, remove excess soil, leveling the surface.
We paint the surface in the color "Green Foliage" using a wide brush.

After drying (you can speed up the process using an ordinary hair dryer, in the "warm blowing" mode), to give further scuffs to our product, we rub some places with an ordinary wax candle.

The style of shabby chic implies the presence of certain "traces of time" on decor products - scuffs, chips, cracks. To simulate cracks, we will use a one-step craquelure varnish. We apply craquelure varnish evenly to the outer corners of our drawer.

When the varnish dries, but remains sticky and does not get fingers dirty (after about 20-30 minutes) we paint the surfaces with beige paint. Important! To make cracks, paint should be applied to the craquelure in one direction with one stroke.

After complete drying, all surfaces are sanded. In order for the scuffs to appear especially actively, those three places with the sandpaper that we rubbed with a candle.

To decorate our product, we chose an ordinary three-layer napkin. We select the element we need, breaking off the edges of the napkin.

We remove the lower white layers of the napkin and place the picture on the workpiece.

In our work, an acrylic varnish for household use, purchased at a hardware store, was used for gluing napkins. We apply varnish with a wide, well-moistened brush, with quick movements without strong pressure. We put a dot in the center of the picture and, as if drawing a snowflake from the center to the periphery, glue our napkin. If wrinkles appear, you can gently lift the edge of the napkin and brush out the air bubbles from the center to the periphery.

If nevertheless small wrinkles remain, we will remove them with sandpaper after the cloth has completely dried.

To smooth the color transition between the napkin and the general background, “beat off” (“clapping” movements) the edges of the picture with a foam sponge dampened with beige paint.

To give "traces of time" the edges of our box "beat off" with bitumen.

The last step in our work is to cover the box with several layers of acrylic varnish (4-5 layers).


Share
Pin
Tweet
Send
Share
Send