Share
Pin
Tweet
Send
Share
Send
Girls are very fond of dressing up their dolls! But after all, dolls are most often sold without additional outfits. And if even dresses are attached to it, then such dolls are much more expensive. Therefore, if you have a sewing machine, patience and a desire to bring joy to your daughter, then you yourself can sew such an outfit. You will spend two hours or less on this lesson. For work, prepare pieces of fabric. It is advisable that they are not loose. You will also need a centimeter, white paper, chalk and scissors.
How to sew pants
Measure the doll's hips. This doll has a girth of 11 cm.

We add one cm to all seams and another centimeter so that the jacket fits freely on the doll. Divide by 4. My measurements: 3.2 cm.
Waist can not be measured. She is "aspen" for the doll, so we just make tucks on the pants. Decide on the length of the product.
Take a piece of fabric, fold it vertically in half, secure with needles. Draw the top line. Measure 6 cm down from it (seat height + hem), and then another 11 cm. From these points, draw horizontal lines. On the top line, measure 3.2 cm. On the middle line, postpone the same and add another 1.5-2 cm. On the bottom line, postpone 4 cm. This is the width of the trousers down. Connect all the points as shown in the photo.

If you want to make the pants already, then cut the fabric to the right by 0.5 cm.
Contour the workpiece.

Make two such details.

In the upper part of the parts draw tucks with a depth of 1 cm.

Sew them. Seam the zigzag top and bottom of the product. Also process the edges where the parts will fit together. Press down.

Stitch each leg with a seam a half centimeter. Process the seam.

Turn the legs on the front side.

Start stitching the halves of the trousers, go through the seam, sew another two centimeters and make a bartack.
Fold the top of the product 1 cm.

Sew on Velcro. One on the front side, and the other on the wrong side.

These are the pants you got. Iron them.

How to sew a jacket.
Measure the breast volume of the doll. For my doll, it was 13 cm. The width of the chest is 8 cm. And the width of the back is 5 cm.

First, we will make a back pattern. On a piece of paper down, lay 10 cm: product length + 5 mm per seam. On top and bottom, mark horizontally 4 cm: half the width of the back + 5 mm for the seam and one cm for the pinches. Make a rectangle. At the top, set aside 1 cm for the neckline and 1.5 cm on the shoulder (already with a seam allowance) from the left edge. From the right edge on a horizontal line measure 2.5 cm (armhole). Connect the lines as shown in the photo. Don’t make a deep deep pass, it’s better not to get to the right edge a little and lower the line down from there.

Cut out the pattern, lay it on a fabric folded in half and chipped with safety pins, and circle. Cut out.

Without removing the pins, lay the cut back on the fabric and circle again.

Now we will do a shelf. The contour, where the middle of the front will be, increase in width as in the photo.

You did this so that there was a smell on the clasp. Lift the neckline slightly upward (for lapel). Find out these two details. Make sure that they do not turn out on one side.
Sew both shelves with a back over your shoulders. Seam the zigzag shoulder seams, neck and shelf in front.

Now make the sleeves. Draw a rectangle with 6x7 cm sides on a piece of paper or immediately on fabric. Lay 1 cm down on both sides. Draw an arc up. This is the head of the sleeve. On the bottom line, measure 1.5 cm on both sides. Connect the side lines. Cut out the pattern.


Make two sleeve blanks. Sew the bottom of the sleeves with a zigzag seam.

Sew them to the armholes, folding them inward.


Work the edges. Iron the seam by bending towards the bottom of the sleeve.
Stitch side seams, zigzag them, iron them.
Make a doll a fitting. Decide where to make pinches on the back and shelf. Make 4 pinches on the back, and on the shelves - one at a time, but deep. Iron them. Also, use the iron to make a lapel jacket.

The bottom of the jacket slightly trim. To do this, on the back side, make it a little shorter. Stitch the zigzag twice.
Sew small Velcro on the shelves at the waist: one on the front of the fabric, and the second from the inside. Sew on the button on the front side of the product, thereby closing the seam from sewing on Velcro.

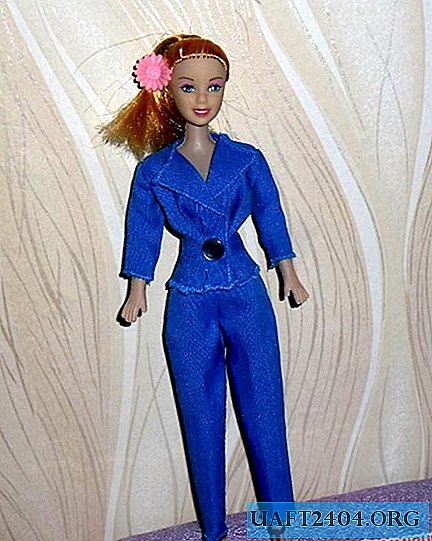
All! Your doll now has a new costume.

Share
Pin
Tweet
Send
Share
Send