Share
Pin
Tweet
Send
Share
Send
It is annoying to pay expensive builder services that you can do on your own. We offer a master class on the manufacture of floor screed with the help of a coarse Strong leveler. This material has advantages over cement-sand mortar, which was used before the appearance of more modern, practical and economical compositions.

Observing the technology, you can make a quality screed with a rough leveler without involving hired workers. To do this, they consistently act according to the stages of the work that are described in this article.
Preparatory work
The floor in the room is cleaned from dirt and dust. Professionals use powerful vacuum cleaners for this. At home, you can do with a broom. When the cleaning work is completed, you need to treat the floor with a primer. It is recommended to use "Concrete Contact", as this tool perfectly improves the adhesion of the base and creates a waterproofing layer. As a result, the chances of wetting the ceiling of neighbors living below are negligible.

The primer should be applied in a continuous layer so that no untreated areas remain. To do this, use a wide brush or roller. The composition is poured onto the surface to be treated and distributed using a tool. This operation is best done with gloves and work shoes so as not to get dirty.

After priming the floor, it is necessary to wait some time, during which the composition will completely dry. It is not recommended to carry out work on a non-dried basis, as this will lead to a decrease in adhesion.

Beacon Installation
The fundamental factor for creating an even screed with a rough leveler is the use of special profiles designed to create a single plane. Lighthouses have a hole through which they can be attached to the surface. In our case, the installation is performed using a leveler. This will provide good rigidity.

Profiles are distributed indoors with a step equal to the length of the rule. This will provide an opportunity to distribute the leveling mixture over the beacons. In the next step, holes are drilled in increments of 50 cm along each profile.

A 6 mm diameter drill is used for punching. Insert plastic dowels into the holes and screw in the screws, which will serve as stops for the beacons and allow you to create a single plane.


To level the screws use a laser level and a screwdriver. The device is installed indoors and turned on.


It is necessary to screw the screws into the dowels so that the distance from each of them to the laser beam is the same. To do this, screw the hardware with a screwdriver. In this case, the length of the gap between the cap of the fastener and the level beam is controlled by tape measure.


When the hats of the screws are located on the same level with each other, they knead a rough leveling agent for the floor and apply it along the hardware. The profile is placed in a solution and abut against stops from fasteners. The spatula align the solution so that it does not protrude above the profile.


Such operations must be done with each beacon. After the composition has dried, you can begin to level the floor.
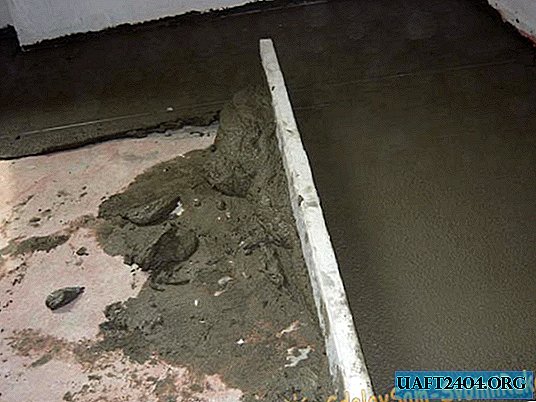
Pouring screed
The mixture is shut with water in a container and thoroughly mixed with a drill with a mixer nozzle. When preparing the solution, it is necessary to follow the instructions from the manufacturer on the ratio of water to dry composition.
The finished solution is poured between the beacons and leveled using the rule.
If voids form on the surface of the screed during operation, they must be filled with a solution and re-aligned with the rule. After performing such actions over the entire area of the room, work on the screed can be considered completed. The coarse leveler is not susceptible to cracking from exposure to sunlight, so the screed does not require care during drying.
Share
Pin
Tweet
Send
Share
Send