Share
Pin
Tweet
Send
Share
Send


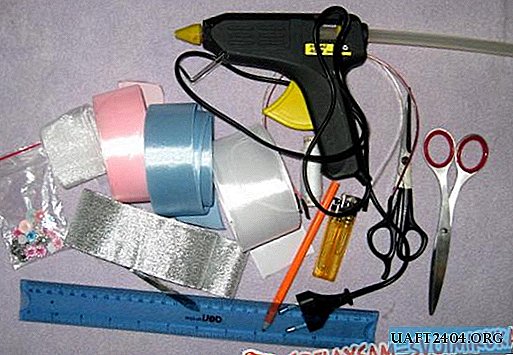
To sew such a shirt, you need the necessary materials, such as:
- Measuring tape;
- Pure paper for making samples;
- Pen-pencil;
- Fabric for a pattern (we have a simple chintz);
- Threads;
- A fastener - a lightning;
- Needles for stabbing;
- Sewing machine or needle for sewing.
Starting work with a pattern, you must first measure the dimensions of the future shirt with a special tape. But it is much easier to get this data when measuring the size of any other of the shirts or dresses in the waist, taken for the sample; this data will be the most accurate.
For example, we have the following data: shoulder length - 8.5 cm, neck length - 25 cm, waist circumference - 65 cm, chest circumference - 77 cm, length from shoulder to waist - 50 cm; arm length - 30 cm, arm elbow circumference - 17 cm. For these parameters, or data, we must make two samples of paper, one front and one back.
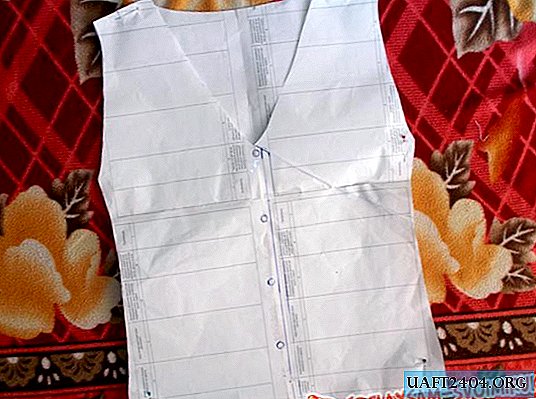
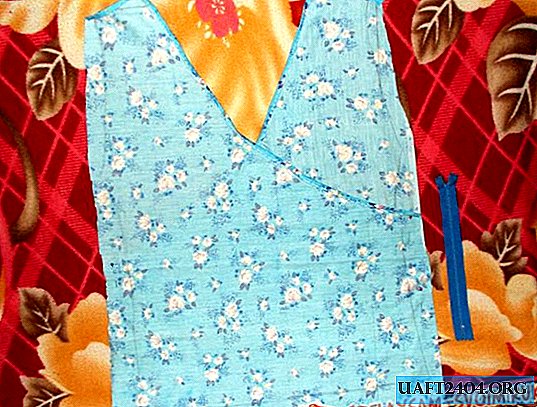
At the beginning of the work, we wanted to make a shirt with buttons, but there were no buttons, and later we decided that it would be better to make it with a zipper. If both samples are fastened together, then it is possible to more accurately calculate the position of the shoulders and sides so that these areas coincide in both samples.
Next, the resulting paper samples need to be pinned with special needles for stabbing to the fabric, and then cut out the samples from the fabric, leaving small areas at the edges for allowance (2 - 3 cm wide), so that it is more convenient for individual tissue samples to be sewn together .
The upper part (shoulder) of the sample on the front side of the shirt, we decided to cut and cut from the fabric two models according to this sample. (Because the neckline of our shirt is pointed, it will be a little inconvenient to make seams at the very bottom of this neckline (you will need extra fabric in order to sew on top)). If you sew two parts of such a pattern, right and left, and then put them together, then the finished shirt will look good:


Now we cut out the fabric from the back of the shirt. In order to be able to cut accurately, we decided to fold the fabric with a paper template in half. After that, having fastened them together, we cut it with small indents:

Now we need to make paper samples of the sleeves. First, we make drawings of samples that we need to cut and then use to make patterns:

Next, we sew the neckline on both samples of the front of the future shirt.
Having added two to three times the sections of the allowance, we fix them with needles for stabbing, and then make seams. You can use a sewing machine, or you can do the seams yourself - which will be more convenient:
Almost the same thing we need to do with a neckline at the back of a future shirt:

Now we sew together the two sides of the front of the shirt, also fastening them with sewing needles, and on one of the sides we need to sew a zipper:

We still have a little fabric, and therefore we sew each sleeve in two parts and shorten the sleeves (initially we expected to make them in full length). Having folded the allowance sections several times on both sides, we first sew the sides of the sleeves, and then the cuffs. At the shoulders you need to leave a small portion of the allowance in order to sew the finished sleeves to the shirt:

Next, we seam together the front and back of the future shirt, and we decided to start sewing from the shoulders.
Noticing that one shoulder is slightly higher than the other, we decided to slightly dissolve the allowance area at the short shoulder, lengthening it in this way and aligning both shoulders. After that, it will be possible to connect the sides to the seams and sew the finished sleeves:

So an almost finished shirt looks behind:

Now we just have to fold the allowance sections in the lower side of the pattern and sew them:

Now we turn the resulting shirt from the inside out:

After that, the shirt can be considered finished: it looks good without a collar when trying on, but if you want, you can make a collar from the remaining fabric. We decided to make it of four parts - scraps:

Having folded at each part of the collar several times on both sides of the fold so that the threads of the fabric do not peel off from the outside, you must first carefully sew the seams on the side of the future collar, and then sew the resulting collar on the shirt.

When sewing on the collar, we will need to make two seams: the first seam will have to connect the collar with the neckline for the edges, and the second will connect the lower edges of the folded section of the allowance with the fabric of the neckline.
We made such sewing patterns, according to which our work was done:


We did all the seams without a machine, manually, and we did not even need a needle for stabbing. This work looked like this:

Thus, we need to make and sew all the remaining parts of the collar:

If the ends of the already sewn-on collar are too raised in some places and open up to the seams, you can hem them to the fabric, after which the shirt will be completely ready.
This is how our shirt looks:

If you try it on, it will look like this:

After that, everything - our shirt without buttons with a zipper is completely ready.
Share
Pin
Tweet
Send
Share
Send