Many car owners often face the fact that they burn out the heated rear window in the passenger compartment. However, this defect can be fixed independently, and you do not need to change the glass, as some car owners do.
The restoration of the heating threads of the rear window of the car is a fairly simple process, and it will not take much time. Moreover, this “focus” will be held both with ordinary glasses, and with those on which the film is.
To restore the heating threads, you will need solvent 647 or similar, P2000 sandpaper, stationery knife, electrical tape and conductive glue. As for glue, you can buy it or make it yourself.

How can I identify a problem spot on the rear window
And before proceeding with the restoration of a damaged thread (or several threads), you first need to identify the very problematic place. How to do it? In fact, there is nothing complicated here.
When you turn on the heated rear window, you can immediately see which line is not working. On this site you will see a cliff. Mark this place with a marker so that you know that it was here that the heating thread burned out.
Repair damaged threads on the rear window without a film
First of all, it will be necessary to wipe the place where the heating thread breaks off with a rag soaked in a solvent. After degreasing, two pieces of electrical tape must be glued exactly under the line and above the line. It is not necessary to start the electrical tape on the thread itself.

The more carefully you stick the electrical tape, the less the repair will be evident, so do everything without rush and fuss.
Next, it will be necessary to strip the area between the strips of electrical tape using sandpaper (it needs to be folded in half). Try to do this very carefully. And then you need to degrease the surface again.

Then it is necessary to apply conductive glue to the damaged area, and it will be necessary to "overlap" a whole thread of 10 mm in each direction. The glue is applied in a thin layer, then all excess is removed with the help of an office knife. Leave to dry for 24 hours.
In a day, you will need to draw a clerical knife along the heating and electrical tape lines from below and above to cut off the cured adhesive from the edges of the tape.

This is necessary so that later it was possible to easily remove the strips of electrical tape without damaging the restored rear window heating line. If you do everything carefully, then no problems will arise.
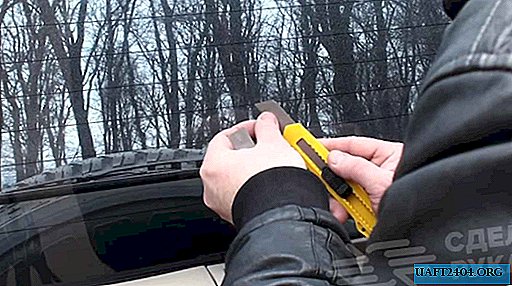
Repair damaged heating threads on glass with a film
In this case, first you will need to carefully remove the film on the damaged area of the glass. To do this, apply a metal ruler exactly under the heating thread, and in this place cut the film from the bottom. In the same way you need to do over the damaged line.

And then it is necessary to make a small vertical cut along the film itself right at the place of damage. After that we pick up the edges of the film on one side and the other, it will open like a petal. Then the edges of the film must be carefully cut with a knife.
Well, then we perform all the same operations as in the first case. After the glue dries (in a day), remove the strips of electrical tape, and your heating thread will work as before. In principle, there is nothing complicated here.
Details on how to restore the rear window defogger threads can be found in the video on our website.