Share
Pin
Tweet
Send
Share
Send
In order to extend the “life” of clothes and linen and at the same time maintain their presentation, they should not only be washed correctly, but also properly dried. It is especially useful to do this on the street, when they are affected by natural factors - wind and sun, and they acquire an incomparable aroma.
Would need
In the forthcoming work, we can do with the following materials:
- profile square pipe;
- metal sheet;
- equal shelving steel corner;
- bolts with a hexagon head, nuts;
- clothesline made from natural or artificial materials.
For work, we need the most ordinary tools and equipment:
- pendulum saw, Bulgarian;
- tape measure, metal ruler, marker;
- drilling machine;
- vice is metalwork;
- core, hammer;
- tap with a knob;
- Allen and open-end wrenches.
Folding dryer manufacturing procedure
We will begin work with the main and most loaded nodes of our homemade product - two brackets of the cantilever type, between which the clothesline or cord will usually be attached in several rows.
A thick-walled metal pipe of square section is suitable for them, from which we cut two workpieces of the required length.

We cut out two identical plates of the calculated size from a metal sheet with a thickness of at least 5 mm, and cut two pieces of equal length along the steel equal-angle corner, slightly exceeding their height.

By marking, we remove part of one shelf from each segment of the corner.


We arrange these elements in the order in which they will be in the rotary node, and we outline the places of drilling, somewhat offset from the center, at the base of an entire shelf of corners.
We drill holes in them, and also repeat this operation for consoles at one end with careful processing of the end part.


We also carry out two symmetrical holes in the shelves of the corner elements shortened by height, the corners of which are rounded.


Again, we install the angles pulled together by means of a bolt and nut and the bracket between them onto the plate and mark the places for drilling 4 holes in it. We carry out drilling.


Next, in these four holes we cut the thread using a hand tap with a knob.

On the plate we install corners with an arm between them with centering according to the drillings, and mark the places of the holes in the corners with which the plate will be attached to the wall.

We attach corners to the plates in pairs with the help of bolts with round heads under the hexagon.
We vertically install the bracket between the corners, focusing on the corresponding holes, pass the bolt and tighten these three elements with a nut. We also tighten the bolts of the corners to the plate using the open-end and hex wrenches.
We lay the bracket with the mount and turn on the side and on it we mark the places for drilling three holes at an equal distance from each other, through which the clothesline or cord will be passed.


We carry out through holes 6 tags in two brackets.
We insert a restrictive bolt into the holes of the corners and tighten it with a nut. It will ensure the horizontal position of the brackets under load when drying wet clothes.

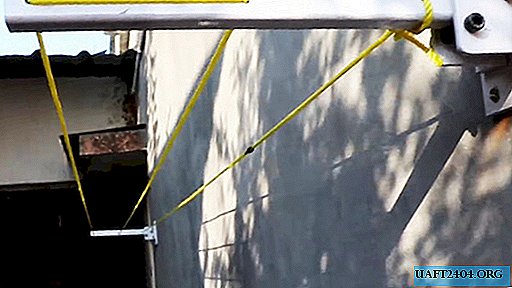
We fix the brackets on a vertical wall and pull the clothesline or cord through the holes in them, tying the ends with a reliable knot.


After drying, the brackets can be rotated around their axes and pressed together with the ropes against the wall so that they do not interfere with the passage or passage, and also are not exposed to rain or snow.


Share
Pin
Tweet
Send
Share
Send