Share
Pin
Tweet
Send
Share
Send
However, among all types of cords, this is the most expensive, and it is not often available for sale, so finding it is not easy. But there is an opportunity to make an analog of such a working element of the trimmer with your own hands from completely affordable and inexpensive materials.
Will need
Everything you need for work can be found in the household or bought in a store, spending quite a bit of money:
- a piece of a two-millimeter steel cable (metal rope);
- a washer with a spline center hole and a flat washer;
- cup-shaped sleeve with a central smooth bore;
- nut with left-hand thread (included in trimmer kit);
- six nuts with rounded top faces;
- two bolts;
- standard solder.

The tools that we need for business, also can not be attributed to rare and inaccessible items:
- vice is metalwork;
- core and hammer;
- drill and hand file;
- welding machine;
- soldering iron and nippers;
- Socket wrench with side handle.
Making a cord holder
On the outer generatrix of the cup-shaped sleeve on the back with the help of a ruler and a marker, we mark two marks on the diameters perpendicular to each other.

Then, focusing on the first four marks, we transfer them to the middle of the side surface of the cup-shaped sleeve strictly vertically.
We clamp the cup-shaped sleeve in a bench vise and in the marked places with the help of a core and a hammer we mark the drilling points, which we do with a drill. You should get two opposite holes located on perpendicular diameters.

We clean the metal around all four holes, alternately treating them with a hand file.
We install and weld a nut with a rounded top above each of the four holes on the outside.


We sequentially clamp two bolts in a vice and directly under the heads we drill through holes with a diameter of a little more than two millimeters.

We screw nuts on them and put both bolts with screwed nuts into the annular recess of the cup-shaped sleeve with the heads inward symmetrically between the two holes opposite each other.


The location of the bolts should be such that the nuts on them are freely twisted and unscrewed from the head to the top of the holes drilled in them.
After making sure once again that the bolts are correctly installed, we weld them to the sleeve on both sides.

We unwind the two-millimeter cable and run it at one end through any of the side holes in the bowl-shaped sleeve towards the bolt. We pass the hole in it with the rope and pull the end of the rope out through the hole in the sleeve on the other side of the bolt, helping ourselves with wire cutters.

We set the required length of the elongated cord and, having measured the same size on the other hand, we bite the cord in the intended place with wire cutters.
We do the same with the second "antennae", and tighten the nuts on the bolts with the open-end wrench with an effort sufficient to securely fix the "antennae" in a predetermined position.


Usually, the tendrils at high working speeds quickly disengage, lose strength and begin to break under the influence of a huge centrifugal force. This affects the operation of the trimmer, but even more dangerous, they can damage the feet of the operator or people in the vicinity.
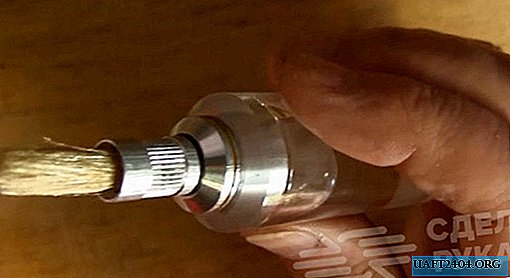
Therefore, you should make a shell of solder with a soldering iron along the entire length of the "antennae" of the cable. Soft solder, which has considerable plasticity, in contact with the stems of grass and small bushes, dampens most of the impact force and, thus, protects the cable from destruction. So, the home-made working body of the trimmer is ready.

Installing the sleeve with antennae on the trimmer

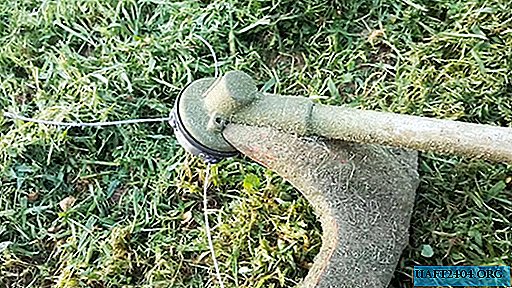
We remove the plastic reel with fishing line from the brushcutter and instead install the do-it-yourself trimmer working body based on a steel two-millimeter rope. Securely tighten it with a nut with left-hand thread using a socket wrench with a side handle, locking the drive from the back with a screwdriver through a special hole.

We make sure that none of the ends of the ropes is touched by a protective cover, which is one of the conditions for safe operation of this tool. To do this, alternately each "antenna" opposite the casing is pulled with a hand and we fix the presence of a quite noticeable gap between the ends of the antennae and the protective casing.

Homemade test in business
We leave with the tool to the place where weeds and bushes grow, and turn on the trimmer, after covering the face with a transparent visor or at least safety glasses.

We are convinced that the work of the trimmer with a home-made working body based on a steel rope has become much more efficient and productive.

Warning
Do not get involved in increasing the diameter used to make the "antennae" of the rope. This will lead to rapid wear of the drive and even damage to the trimmer motor, especially if it is electric, due to increased forces. It also increases the likelihood of serious injuries if the “antennae” of the cable breaks at high speed.
Share
Pin
Tweet
Send
Share
Send