Share
Pin
Tweet
Send
Share
Send
We are not talking about a powerful vacuum cleaner that can vacuum an entire apartment. It is rather an assistant, in the case, for example, when something was scattered, and reluctance to get an ordinary, large vacuum cleaner. The motor inside the hair dryer is 9-12 volts. It is powerful enough to collect even spilled rice groats, not to mention smaller debris. Also, using such a miniature vacuum cleaner it is very good and convenient to remove dust from indoor plants, small souvenirs, from the surface of the cabinet and other hard-to-reach places where it is difficult to get with an ordinary vacuum cleaner. To build such a vacuum cleaner from an old hairdryer, you must first find out the breakdown, if any. For our homemade products, the most important thing is that this device has a working motor. The rest does not matter - anyway, the rest will be deleted ...
Will need
- Old hair dryer (with a working engine!).
- Simple switch.
- 9 volt power supply
- The upper half of the plastic bottle (with neck and cap).
- Metal-plastic tube with a diameter of 20 mm (15-20 cm long).
- A small rag bag under the outer diameter of the hair dryer.
- Tool and consumables:
- Second glue and soda.
- Soldering iron, with flux and tin.
- Bor machine with a cutting disc.
- Stationery knife.
- Scissors.
- Screwdriver.
- Marker.
- Pliers.

Making a mini vacuum cleaner with your own hands
First you need to disassemble the hair dryer, which we plan to convert into a vacuum cleaner. To do this, using a suitable screwdriver, we release the fixing screws from the housing.

Next, we disassemble the case into parts and put it aside - while we work with the internal parts. Using nippers, or pliers, remove the heat-resistant partitions with a nichrome spiral wound on them. If heat-resistant partitions may be suitable in the future, then you can send the spiral without hesitation to the trash - it most likely has already outlived its own ... Next - the switch. The switch that is installed in the hairdryer’s case initially will not work for our purpose, because it has several modes. Namely; turning on, switching speeds, and turning off. We also remove it from the structure and remove it somewhere, on demand. In place of the remote switch, install a simple switch. I have a standard switch, I did not go a little to the case, so I had to modify the case with a machine with a cutting disc.


We also remove the resistors from the motor with the wire cutters, which are soldered to the contacts, since the motor power will go directly from the power supply to 9 volts.

We cut off the back of the hair dryer, on the side where the air will be drawn from.

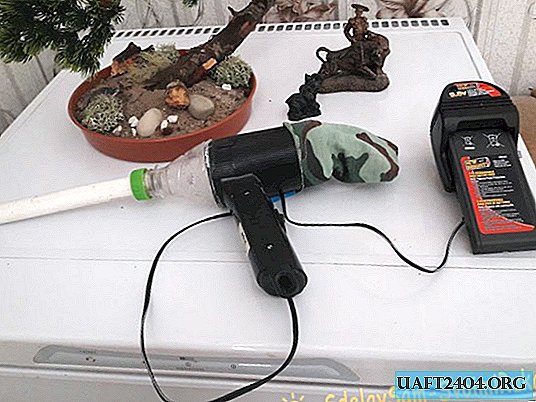
In general, we cut out and bite off everything except the motor attached to the body with the propeller. Next, take a 9-volt power supply (I have a removable battery, but you can use a regular one), put a plastic plug on the hair dryer handle on its two-core cable.

We check the polarity of the motor, and solder the wires of the power supply to the contacts of the motor.


Further, having estimated where the switch will be located approximately, we cut one of the supply cores, and solder the switch into the gap formed.

We install the switch in its place in the case, put the engine with the propeller in place, and then fasten the whole case together with the help of fixing screws.

For greater reliability, I added a couple more drops of glue, since the body of my hairdryer was rather flimsy.

Now it's the top of the bottle.

We cut off the neck so that it fits on the round body of the hairdryer, in the part where air and garbage will be sucked in the future. We align as evenly as possible, and attach to the body with a second glue and soda.

The main work is over. It remains to collect the nozzle on the resulting vacuum cleaner, and a garbage bag. To make a thin nozzle is a matter of a couple of minutes! Cut a hole in the bottle cap for a piece of metal-plastic pipe.

We stick the pipe into the hole, fix it with glue with soda, and cut off the tip at an angle of 45 degrees.


Next, we simply wind the nozzle onto the body, like an ordinary bottle cap.

There can be several such nozzles of different shapes for different purposes. Well, now the pouch. Instead of a bag, in fact, you can use anything. For example, a sleeve, or a sock. But I couldn’t find where to tear the sleeve from, and it seemed to me not very aesthetic to use the sock, therefore I sewed the bag myself, out of an unnecessary rag, in a couple of minutes.

Well, now we pluck off the second, opposite lattice from the hair dryer with pliers and put on a bag on this end.


The bag should sit tight so that it is not torn by a stream of air. You can even probably fix it with tape, although I did not. That's all. You can check.


You can see the tests of the mini vacuum cleaner below, at the end of the video on the assembly of this device.
Share
Pin
Tweet
Send
Share
Send