Share
Pin
Tweet
Send
Share
Send
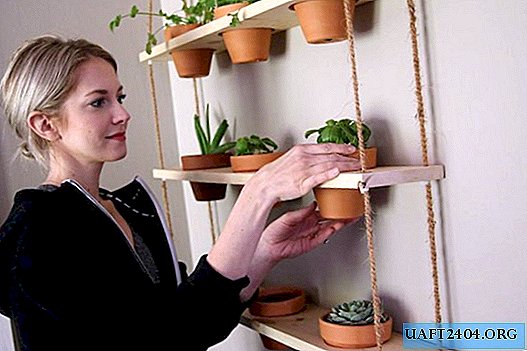
Fresh herbs provide more health benefits than dried spices. Most herbs are not whimsical. They can be grown at home, which will help provide the family with natural vitamins all year round. To make a hanging rack for plants is not at all difficult with the help of improvised tools.

Selection of materials
Shelves will require natural boards. Use pressed wood does not make sense, because the plants will have to be watered periodically. The high hygroscopicity of solid wood boards is a small drawback if, before installing plants, the board is treated with antifungal impregnation, which reduces the level of water absorption in the fibers.
For work, it is most profitable to take coniferous wood. The most unsuitable type of tree for work is birch. Such a board can crack during drilling, and during operation in a room where humidity and air temperature often change, this material is more prone to deformation.
To connect the shelves you will need a nylon rope. She will serve longer than the rest of the species, working with her is simple. If the style of the room requires it, you can use hemp rope. Its main disadvantage is that the smells that have absorbed into it will settle in the kitchen forever.
As suspensions, it is best to choose screw-in mounting and decorative hooks. They are sold with dowels. Given the need for periodic shelf care, which is best done outside the kitchen, in addition to the hooks, 2 monolithic stainless steel rings can be used. Plastic is not suitable due to the severity of the structure!
Working process
Choosing a wall on which the minimum time per day is exposed to direct sunlight. We retreat from the shaded corner, measure the area that will be occupied by the shelves. This will be the necessary length of the main elements of the hanging rack. Having marked the points of the edges of the upper shelf on the wall, gently indent 5 cm inward, make notes, put the same distance of 30-35 cm from them upwards. This will be the place for drilling for installing hooks that hold the weight of the structure.
Attention! Hooks must be no thinner than 8 mm, the length of the part screwed into the dowel is at least 8 cm. The more massive the shelves and the more pots with soil, the more durable the fasteners are needed.
The distance between the shelves is determined by the maximum possible height of the plants with an allowance of 10-15 cm. Their width depends on the selected diameter of the pots, for which you need to cut holes. The distance from the edge and the wall to the hole should not be less than 3 cm.
Tools to do without:
- drill;
- drill "feather" with a diameter of 12 mm (wood);
- drill bit for concrete in diameter suitable for dowels mounted in the wall under hooks;
- electric jigsaw with a laser pointer;
- plane;
- a grinding machine or sandpaper with several fractions of abrasive grain.
The beginning of work begins with the processing of wood with a planer and a grinding machine. External corners must be rounded and sanded. On all 4 sides, holes are drilled under the cord. The distance from the edges of the board is the same - 2.5-3 cm, even if the rack is made in the form of a slide. In this case, it is possible that the lower element may differ from the upper by a quarter of the length.


Pre-prepared items need to be marked under the pots. The distance between them is preferably 10-15 cm, so the plants will receive a sufficient amount of light. Having drawn the circles, it remains to drill a hole inside the circle so that a jigsaw can be inserted into it. Having made a cut to the circle line, you have to carefully cut holes in the stands, treat them with sandpaper (first large, and at the final stage with a null).


Prepared wooden elements are fastened together with nylon cords (2 on each side) using volumetric nodes that are larger than the holes. For greater reliability, additional wooden or plastic decorative elements can be knitted in them. So under the influence of the weight of the shelves and pots, the knot will not become critically small.


For tight fixation, the knots are tied both under the shelf and above it. This option requires more effort when adjusting the horizontal position of the elements. The selected step for fixing the shelves is set by the segments between the nodes on the part of the cord located near the wall. The outer part will be slightly longer, which is determined by the width of the top element. The upper shelf is attached directly to the hooks, after which it can be removed and the lower ones fixed using a ruler.


Having hung the shelves on the hooks, it remains only to insert pots with spice seedlings planted in the holes, supplement the kitchen interior with fluorescent lamps, because in the winter season the plants will be sorely lacking.
Share
Pin
Tweet
Send
Share
Send