Share
Pin
Tweet
Send
Share
Send
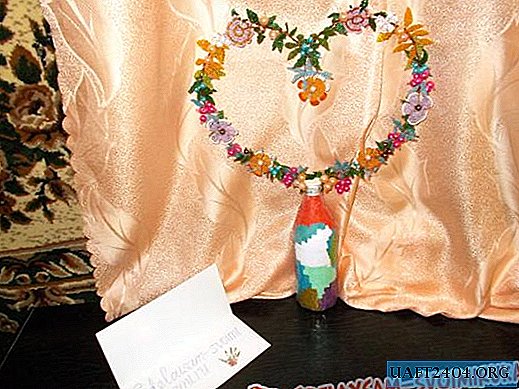
To make such a souvenir, we needed:
- The wire is thin (from 0.01 mm thick);
- The wire is thick (from 2 mm.);
- Nippers, tweezers;
- Beads of green, blue, yellow, orange, purple and white;
- Beads of blue, white, brown, pink and beige;
- Bottle of lemonade;
- Plaster with water;
- Plain paper;
- Polymer adhesive for glass;
- Colored paper, scissors;
- PVA glue or pencil;
- Scotch.
Getting to work, we took a bottle from under the lemonade and, after rinsing it several times, left it to let excess water out of it:

When the bottle dries, we will need to paste it over with plain paper to apply a preliminary layer, which will need to be pasted over with several layers of colored paper particles. This layer can be made up of pieces of different sizes and shapes:

Having made a smooth and neat surface of white paper, we cut colored paper into small squares of different sizes and paste a bottle over them:

After that, we apply a transparent varnish or adhesive tape to the surface so that the paper surface cannot quickly get dirty:

Next, we take a thick wire about 150 cm long and twist it into a heart shape; we knit both ends in the lower side of the figure, forming a large knot.

It seems to us that this wire alone may not be too strong and bend under the weight of all the bead jewelry that will load it. Therefore, it is advisable to take either two wires for work, or not to overload the figure with jewelry.
Now in a separate cup we plant some gypsum and use it to attach the figure to the bottle. Due to the fact that the neck of the bottle is narrow, and the knots of the wire are quite large, the figure held perfectly in it and it was easy to fix it with gypsum (not a single particle of gypsum fell to the bottom). After that, we cleaned the areas of the crafts that accidentally hit gypsum, and left it to dry:

Now we set about making leaves, berries and flowers from beads. Taking a thin wire, we string one of the beads on its middle, intending to make a leaf:

We attach two more to this bead, passing them through the ends of the wire:

Then three, four:

Having made the middle of the leaflet, in the subsequent rows we gradually reduce the number of beads, and, reaching the last, we tie the wire several times.

After that, we attach a thin wire to the copper figure, on which we will string the finished figures of leaves and berries.

The first "berry" in our craft was a large beige bead. In order for it to hold firmly and the wire does not stand out on the surface, you need to attach a small bead on the other end of the bead:

Thus, we will collect all subsequent leaves and berries that we will need to make.

Now we are starting to make flowers. In order to collect one flower, we made seven petals and one "ring" of wire and beads. Any shade of petals can be taken, - to choose from:

Each of the petals we attach to a couple of beads from the "ring":

It remains only to attach a bead to the center of each collected flower:

After that, we attach them to our craft:

Next, we create several purple flowers with white edges and attach them to the souvenir:


Before decorating the figure with flowers, we managed to collect several rows with blue, pink and brown berries, decorating the craft:

After that, we decided to collect two white flowers and two violet with orange stripes, but in a slightly different way than the previous ones. Having made eight petals, we string them on a wire, one of the ends of which we draw along the second circle:

Then, making another semicircle and drawing both wires in opposite directions, we string a small bead and bandage the wire in the back of the finished flower:

We attach the finished flowers to the craft. During the work, you can make yellow leaves in case of lack of green and blue beads. There are nine flowers in our flower crafts:
After that, everything - our craft is ready. It took us about 2 weeks to make it, and it seems to us that it turned out to be very beautiful:


Sincerely, Vorobyov Dinara.
Share
Pin
Tweet
Send
Share
Send

