Share
Pin
Tweet
Send
Share
Send
Some time ago, nail extension was an innovation and only professional salon workers were involved in this procedure. Today, a lot of girls do it on their own and without feeling a difference in the result. The price, in turn, is quite different, because everyone knows that in the cabin this pleasure is more expensive.
If you decide to extend your nails, it is important that you enjoy it. The build-up procedure is a very creative and interesting activity, but it may seem very boring and dreary. The most important thing here is to use your imagination correctly and not to forget about important trifles. For example, do not forget that you first need to treat the nail plate with a degreaser.
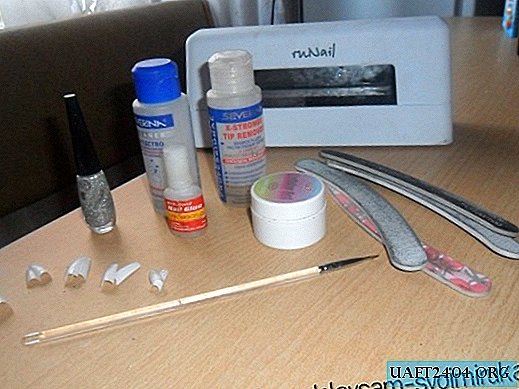
So, for nail extension we need:
1. Primer (degreaser);
2. Glue (best with a brush);
3. Tips;
4. A gel or acrylic to fix all this beauty (to use the gel you need an ultraviolet oven. It is necessary to dry the gel on the nail);
5. Liquid for removing the sticky layer from the nail;
6. Details for decoration.
We will divide the entire sequence of the creative process of nail extension into points:
1. On the nails treated with a primer we glue tips (to glue from the middle of a nail). After that, we make the desired length and shape of the nails;

2. Carefully file the tips on the side of the nail plate. The place of adhesion of the tips and the nail should not be noticeable.
3. Once again, we process the nails with a primer, for the best adhesion of the material to the tip;
4. Apply a thin layer of gel on the nails and put your hand in an ultraviolet device (oven) for 3-4 minutes;

5. After that, without removing the sticky layer, apply another layer of the gel, which should be thicker than the first and put our hand in the device again at the same time;

6. The third layer is applied at your discretion. Suppose if you feel that the nails are not strong enough and can break, be sure to apply another layer of gel. Most importantly, the thickness of the nails should not stand out. If necessary, file bumps on the surface of the nail plate.
7. Decorate the nail as you wish using varnish, gloss or various designs.


Share
Pin
Tweet
Send
Share
Send