Share
Pin
Tweet
Send
Share
Send
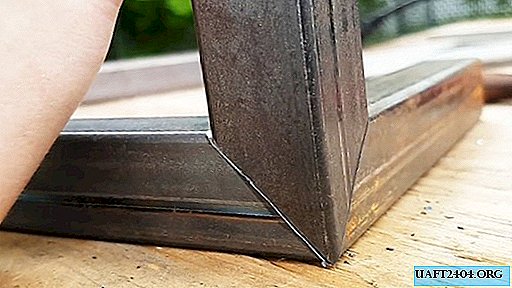
Such a connection is usually used for aesthetic purposes, because for ordinary designs there are simpler mounting options, but at the same time providing better strength characteristics.
Will need
In order not to be distracted during the course of work, the following tools and materials should be prepared in advance:
- three identical sections and lengths of a segment of a rectangular pipe;
- metal marking triangle with angles at the base of 45 degrees;
- marker;
- pendulum saw with a rotary table;
- removable clamp.
The process of making a double corner joint
This work can be divided into two parts: markup and, in fact, the connection. If the first part of the work is done correctly and with the required accuracy, then the second turns into a simple formality.

So, let's begin:
1. Using a triangle, draw a line at 45 degrees on three segments along the wide side closer to one end. To save material, it can be carried out at the very end - from one of the end angles.

2. We set the table of the pendulum saw on a scale of 45 degrees, which automatically ensures the location of the plane of the disk of the cutting tool with respect to the part being cut at the same angle.

3. Alternately we make a cut according to the marking, which is duplicated for reliability by fixing segments of rectangular pipes to the table using a removable clamp.


4. Turn the pipes with beveled edges 90 degrees and again mark the marking at 45 degrees.


5. Once again, repeat operation number 3 (installation, fastening, segment), but according to the new markup.


6. We connect on the horizontal surface two prepared pipe sections with ends, sawed off along the larger diagonal. For reliability, you can measure the outer angle: it must be exactly 90 degrees.
7. We take the third pipe segment and, having tried on the first two in the assembly, we already make the usual marking and form a shaped part with the help of a pendulum saw that will coincide with the corresponding faces of the first two segments assembled together.


Cut off on both sides.

As a result, the angular connection is obtained by itself.

Conclusion
The second part of the work - joining, can be done by gluing, if the material is wood or plastic, by soldering, gas-acetylene or electric welding, if the details are metal.
Share
Pin
Tweet
Send
Share
Send