Share
Pin
Tweet
Send
Share
Send
What materials will be needed
- Bolt (35 mm) and hairpin (70 mm) with thread 12;
- Extended nut (25-30 mm);
- Two ordinary nuts;
- Coupling nut (wing nut);
- Plastic holder (side handle) "grinder".
Preparatory work

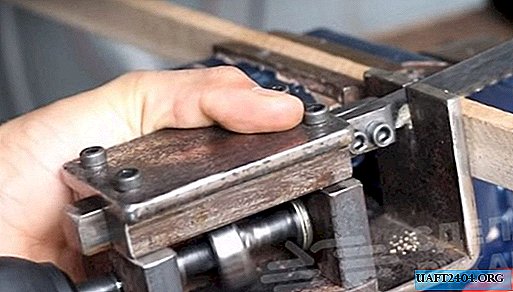
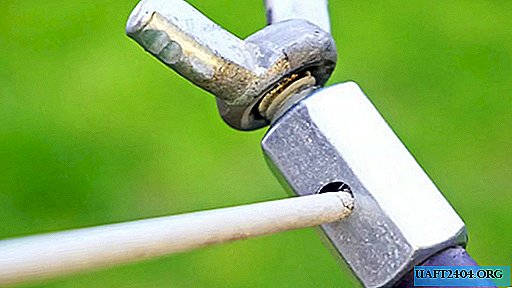
First of all, on the elongated nut we mark the center, after which we clamp it in a vice. Using a conventional drill, we drill a through hole. The diameter of the drill should be about 1/3 more than the possible thickness of the electrode .6-8 mm. Care should be taken to ensure that the drill is strictly perpendicular to the edge of the nut.

Then we clamp the bolt in a vice and use a grinder to cut off the hat. At this point, weld a coupling wing nut. The length of the free thread should be no less than the distance from the edge of the long nut to the center of the hole made.


Unscrew the handle from a non-working grinder, drill or other similar tool.

The inner bolt is easily knocked out.

Clamp in a vice and drill a hole for our hairpin.

Now you can start assembling.

Assembling an exclusive, reliable electrode holder

We screw the stud and the bolt with the wing into the wide nut so that they do not slightly reach the edge of the hole made.

Next, insert the entire structure into the handle and visually mark the place to which the fixing nut is to be tightened.

After we twist the double nut, and on the opposite side we install the nut to the desired depth. We wind the wire going to the welding machine and clamp it with another nut, using two open-end wrenches for this.

We place the hairpin with the wire inside the handle and finally fix it with a double nut on the outside. We insert an electrode into the hole and twist the wing bolt with a little effort. Now you can start welding.


What should not be forgotten
Throughout all work, tools such as a drill, a grinder and a welding machine were used. All of them require increased attention, because non-compliance with basic safety rules and neglect of personal protective equipment (work gloves, goggles, a welding mask and overalls with a long sleeve made of non-combustible materials) can cause injuries, sometimes quite serious.

Test
After conducting test welding, I can say with confidence that our home-made holder is a complete replacement for industrial analogues. It reliably fixes the electrode, and in cases of sticking it is quite easy to detach from the surface to be welded (in the factory handle it often jumps out of the clamp and remains welded to the workpiece).


The only drawback is the fact that this handle is made of plastic, although durable. With continuous operation, heating in any case occurs and the handle may become deformed. The rest turned out to be an excellent handle, the cost of which is three nuts and two bolts.

Share
Pin
Tweet
Send
Share
Send