Share
Pin
Tweet
Send
Share
Send
Required Tools and Materials
To assemble a digital antenna you will need the simplest set of tools, namely a screwdriver, pliers, wire cutters, a hacksaw for metal, a drill, a tape measure or a ruler. From the materials you need to purchase:
- PVC pipe 40 mm - 80 cm;
- galvanized wire with a cross section of 2.7 mm;
- galvanized wire with a diameter of 0.8 mm;
- small mesh galvanized wire mesh;
- M4 screws 30 mm - 8 pcs.;
- M4 screws 60 mm - 4 pcs.;
- M6 studs 140 mm - 2 pcs.;
- nuts for M4 screws - 12 pcs.;
- nuts for M6 screws - 8 pcs.;
- washers for M4 screws - 12 pcs.;
- washers for M6 screws - 8 pcs.;
- antenna adapter TS9, DVB-T RF or any other with wiring.

You will also need to pick up a piece of plastic and make 4 plates of about 7x3 cm from it. You can cut absolutely any plastic product of sufficient thickness, at least 5-10 mm.
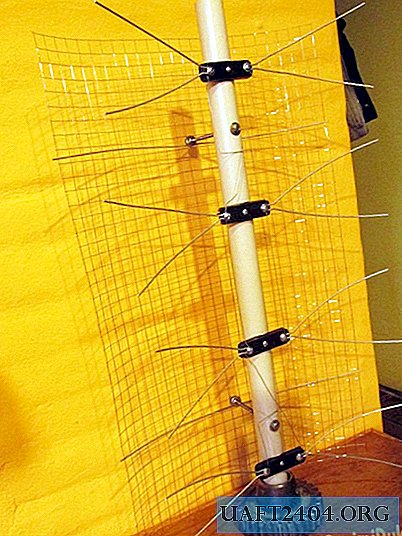
Digital TV antenna assembly
First you need to embed windows on the PVC tube to insert plastic pads. The extreme ones are indented from the top and bottom of the tube by 10 cm, the remaining 2 with the observance of a step of 20 cm. Windows cut into a height of 32 mm. After that, you need to drill holes to pull off the plates with the tube. For this, screws 60 mm long are used. In addition, it will be necessary to make holes at the ends of the plates in order to further fix the antennae.

Now you need to make the antennae themselves. They will need 8 pieces. The antennae are bent in the shape of the letter "V" from a thick galvanized wire with a cross section of 2.7 mm. The length of each side should be 20 cm. The ends must be bent at such an angle that the distance between them is 12 cm. The finished antennae are attached to the plates of 2 each. To do this, use 30 mm screws and washers.

It’s the turn of the screen assembly. To do this, cut a galvanized grid to a size of 66x48 cm. Above and below the grid is done on the mount. To do this, you need to get through the cell a thick wire with a cross section of 2.7 mm. A loop is made in its center, which will subsequently be used for attaching with a hairpin.

Next, you need to put the grid in the center of the rectangle created by the ends of the antennae. Opposite the hinges, through holes are made in the tube. Studs with a length of 140 mm are inserted into them. First, each of them is fixed on the tube on both sides by nuts and washers. After a similar way, a grid with loops is attached to it. The distance between the beginning of the net and the tube should be 80 mm.

It remains to connect the antennae with each other. For this, a galvanized wire with a cross section of 0.8 mm is taken. The connection is carried out according to the scheme. For reliability, you need to press the wire with the same washers with which the antennae is fixed.

To connect a television coaxial cable to the antenna, you need to take any adapter with a cable. It can be TS9, DVB-T RF or any other. The unnecessary part of the adapter is cut off, and the remaining wiring is screwed on according to the scheme. After that, a coaxial cable going to the TV is connected to the existing adapter using a suitable adapter.

This is a completely simple antenna to assemble, which can be done in literally an hour. It is installed on the street, like an ordinary analog antenna. When using a short coaxial cable, you can do without an amplifier. If the TV supports T2, then you do not need a signal converter.

This antenna is broadband and will catch channels of both analog television and digital. Regardless, even in the meter, even in the decimeter frequency range.
Share
Pin
Tweet
Send
Share
Send