Share
Pin
Tweet
Send
Share
Send
Is an expensive service really necessary, or can you complete this procedure yourself?
- A stand for checking and installing wheel angles certainly simplifies the process itself. The car stands strictly horizontally, the front wheels are located on rotating disks. In addition, thanks to the laser measurement system, the accuracy is quite high. There is no need to delve into the corner tables, and try them on your car, the information is in the databases. This is a positive side.
- On the other hand, despite all this electronics, and "laser guidance systems," the nuts are twisted by a regular mechanic. Often dubious qualifications. So the error is determined not by the cost of equipment, but by the directness (or curvature) of the hands of a car mechanic.
All this equipment is designed to accelerate the process, and its commercialization. If the alignment of the alignments on the stand takes no more than 30 minutes, then in a garage you can spend several hours. And if you do not have a hole, then the process lasts even longer.
As for the accuracy of measurements - the walls of houses, built according to the water level and plumb line, are no more curved than modern buildings that were measured by the laser level.
Our fathers and grandfathers did not hear anything about the tricky stands, the line in the car service was no less than in the Lenin's mausoleum. Nevertheless, the cars drove smoothly, and the tires wore out evenly (taking into account the deficit - the tires were cared for like the apple of an eye).
How was this done?
In the "Maintenance Instructions" of the car, among other parameters, there are camber, toe and castor angles. Don't you have such a book? All right! Car dealers believe that the owner has the right only to turn the steering wheel and shift gears. The rest should be done by an authorized service, and for your money. Therefore, only the "Operating Instructions" is attached to the new car. In which it is described in detail how to switch the radio channels on your multimedia system, and turn on the seat heating.
If you try, information can be found on any brand of car. To begin with, let's define the terminology:
- Camber - the angle of deviation of the plane of the wheel relative to the vertical. That is, the wheels are either a "house" or a "boat."
- Convergence - the angle of deviation of the plane of the wheel relative to the longitudinal axis of the car. The wheels can be set strictly along the axis, or between the front edges the distance is less than between the rear. The wheels seem to be looking at one point on the horizon.
- Castor - the angle of deviation of the axis of rotation from the vertical. The axis is usually tilted back. This option is not set at home.
Camber setting
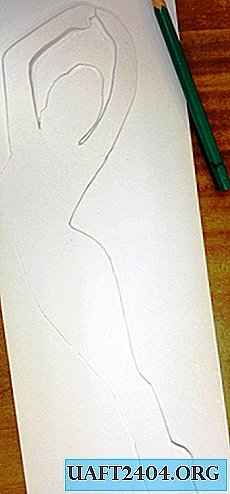
Having obtained these indicators (in degrees), we translate them into millimeters. To do this, draw an imaginary triangle (see illustration).
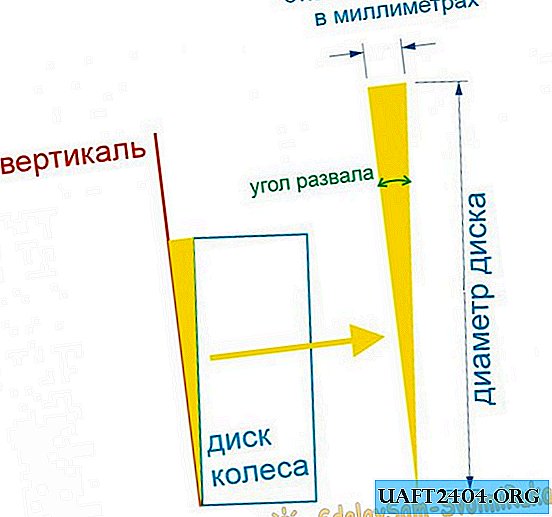
The camber angle is known, the diameter of the disk, too. The camber deviation in mm is calculated according to the school geometry course. The resulting value is the difference in the distance of the lower and upper edges of the disk relative to the vertical. It’s easy to install the vertical: we hang a plumb line on the wing.

And measure the deviation. The adjustment on each vehicle is different. As a rule, the axles of the suspension arm are fixed with eccentric bolts. But this is already a technical matter: the main thing is to understand the principle.
Convergence
Here the procedure is much more complicated. First, prepare the surface under the front wheels. They should turn relatively easily. There are no rotating supports in the garage, so we smear the floors (you can put pieces of old linoleum) with soapy water.

And we hit the front wheels on a slippery area. Then you need to lock the steering wheel to the "straight" position. This can be done using a long board and level.

We pull the fishing line along the hub centers. It should be at the same distance from the centers of the front and rear wheels.

The difference in distance from the fishing line to the front or rear edge of the disc is calculated as well as for camber. Of course, not in degrees, but in millimeters. Carefully rotate the toe-in clutch (in different models of cars - the design may vary).

And we achieve the correct installation angle. The procedure must be repeated several times, checking the distances at both edges. When turning the wheel, both distances change.

Similarly set the second wheel toe.

The accuracy of the installation of angles depends only on your accuracy and patience. After finishing work, your humble servant drove to a friend, at the service (where there is a 3D stand). Tested corners - everything turned out to be within the factory tolerances.
Output:
If you have a place and time for self-service car, you can save on basic operations.
Share
Pin
Tweet
Send
Share
Send