Share
Pin
Tweet
Send
Share
Send
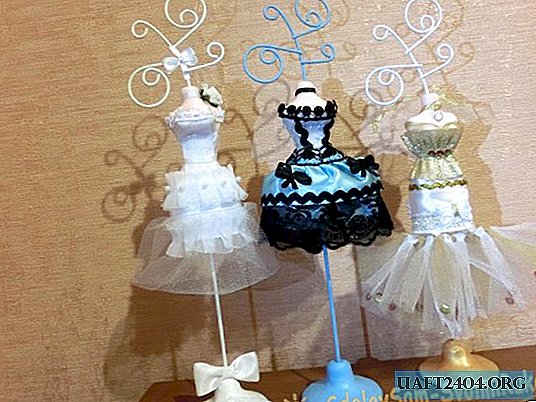
Any girl or woman likes jewelry - earrings, rings, bracelets, so such a gift as a holder for jewelry will always be in demand. Especially if it is in the form of a fragile mannequin in a chic dress. As already mentioned, this gift is relevant for women of any age, it can be used as a hanger for earrings, rings, chains, as well as perfectly decorate the interior of the room. For the manufacture of this wondrous little thing, we use the following materials:
- Polymer clay (flesh color).
- Clay Moment (transparent).
- Holders of any shape.
- Ribbons, braid, beads, lace.
- Acrylic paints.

Sculpting process
The whole process begins, of course, with the modeling of the body of the dummy. Mash clay in your hands, after washing your hands. Fashion the torso, neck, waist, hips. Use a wooden stick to sculpt small wrinkles on the clay, moving it from side to side. Having fashioned two balls for the chest, fit them to the body again with a stick. Make sure that the figure is even, the shoulders are on the same level. With the back of your finger, smooth out unnecessary folds. Make sure that no fingerprints remain on the mannequin. Next, carefully insert the holders instead of the hands, and instead of the legs, we also screw in a clay a wand or a metal twig as in my case. You can use different holders, which you will find, for example, I adapted curls from other unnecessary metal coasters, you can make them from wire or find plastic parts that are suitable in this case. Again, they can be inserted both instead of hands, and instead of the head into the neck of the mannequin, depending on what shape they are. Now let's take a stand. We make a ball out of clay, put it on polyethylene so that the clay does not stick to the table and we make a round stand. Do not forget to make a hole in the center of the stand with a metal rod, which will be inserted into it later. When the molding is completed, go to the next stage - cooking the product in water.

Find a pan in which you can freely place the figure with all the holders in the finished form. While you don’t have to put a stand on the mannequin, you just cook it next to the mannequin in one saucepan. When the water begins to boil, count down the time 10 minutes and turn off the oven. Drain, cool the product, as it is still brittle after cooking, protect it from falling. When everything cools down, insert the mannequin with an iron bar into the stand and start decorating your figure with different elements.
Dummy decoration
First, paint all the jewelry holders and the stand in a single color, for example, in white or gold, depending on what color you want to make the dress. Variations here can be very different. The stand can be decorated with a flower made of fabric, or a piece of lace.

Now that all the minor work is finished, it's time to get busy with the dress. Using satin ribbons of different widths and glue we form a dress. It is not necessary to use threads and a needle, the main thing is to correctly guess the width of the ribbons. Around the waist, let the tape thinner, on the skirt wider, place the joints with thin lace, as well as the edges of the skirt. For such crafts, fabrics that do not spill and hold their shape very well, such as tulle, are very suitable. With it, you can make two-three-layer air skirts. Even a single layer of tulle on top of a satin ribbon looks spectacular. If appropriate, decorate the skirt with beads, mini-bows. Bows are usually made from the thinnest ribbons. At the end of the chest line - neckline, glue it with thin lace. Glue all details of clothes with glue. Here is what can result from the whole process.


Or else like that!

A wonderful gift for the fair sex is ready, it remains to pack and give.
Share
Pin
Tweet
Send
Share
Send

