Share
Pin
Tweet
Send
Share
Send
In fact, there is always a way out and its name is needlework. Already for many it is no wonder to see artificial plants. Many families with allergic children have discovered such a miracle as crocheted potted flowers. And this is wonderful! After all, such a plant is able to conquer even the avid connoisseurs of wildlife!
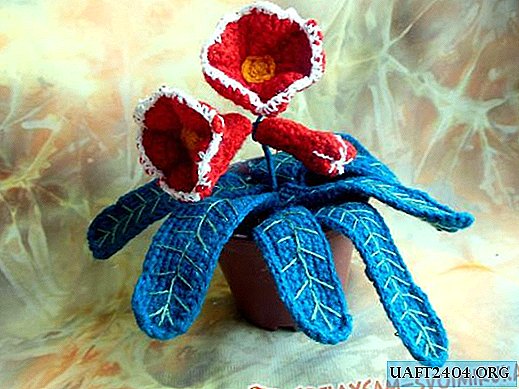
To create such a flower will require not only yarn and a hook, but also 2-3 hours of your time, diligence, desire, as well as knowledge of the basic principles of crocheting.
Let's get started? For knitting gloxinia room we will prepare red and green yarn, plus a few white and yellow threads for decoration, and another hook 2.0 mm.

From the yarn intended for a flower (it can be not only red), we collect 4 air loops (v. P) and knit 4 rows with a single crochet (st. / B. N).


In the 5th row, around the edges we knit 2 columns from one loop and knit 2 more rows of st / b. n

We knit the first 3 stitches of the 8th row st./s 1 n, we knit the next loop again without crocheting and end the row with three sts / s 1 n.


Then we align the finished petal by tying its contour with a connecting column.

In total, about 5-6 of these petals are required, which form the desired inflorescence.

And to keep these petals will be the yellow center. It consists of two round parts, knitted st./b. n circular viscous.


First you need to sew the petals to one mug, and then strengthen them behind with the same yellow blank.


Next, tie the contour of the petals with white thread, collecting the flower together.


Now, the side incisions are carefully sutured and proceed to lengthen the receptacle.


To do this, we bind the external yellow "sealant" of the base in a circle st. / B. n, gradually reducing their number.


You get a long tube, which you need to finish abruptly (close all the columns, 6-7 pcs. - with one loop).


Creating a bud is even easier. You should dial 8 loops, knit 9 rows of st. / B. n and in the next three rows constantly double the number of columns (from each loop knit 2).

Then sew this blank along the cut and pick it up, then apply a white finish.
The leaves at gloxinia are even and narrow (without embossed elements or teeth along the edges), which makes it very easy to fit. We gain 30 in. n and tie this chain from all sides of the station / b. n

The sides of the leaf should increase greatly (3-4 increases per loop) so that its shape does not resemble a saucer.

After the leaf gets the desired width (2-3 cm), apply light green veins on its surface with a needle and thread.

For a small plant, 7-8 leaves are enough. Inflorescence is done alone, but includes several flowers and necessarily at least one bud.

The best material for the pedicel will be copper wire (it is advisable to choose a thick one).
You just need to put a leaf on it and twist both ends into a dense stalk, after which it will be "greened".


We fix the flowers in the same way and combine them, and wrap the stalk again with green thread.


First we immerse him in a flower pot filled with liquid alabaster.

Let the leaves in a circle, placing them as close to each other as possible.

Now gloxinia will always bloom on your windowsill. There is no need to worry about watering, temperature conditions or other conditions for the development of a flower, you can only admire the excellent beauty of this plant and enjoy the picturesque view.

Share
Pin
Tweet
Send
Share
Send