Share
Pin
Tweet
Send
Share
Send
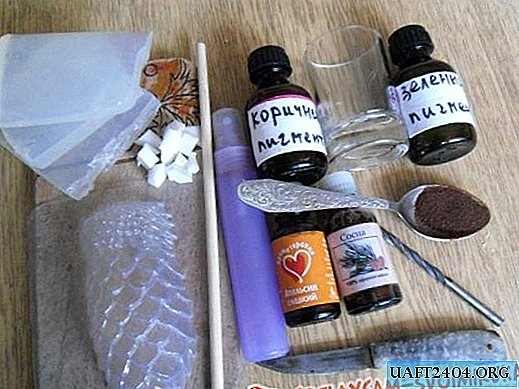
• transparent soap base (hereinafter referred to as MO), 100g;
• dyes: brown, green and white, instant coffee (those who wish to use instead of brown dye);
• mold "pine cone";
• a knife for cutting soap, a wooden stick from sushi;
• essential oil of pine, fir, cedar or something to your taste;
• any alcohol for spraying layers of soap;
• microwave and glass cup with thick walls.
Getting started.
1. Transparent MO, about 75g, cut with a knife into small pieces. Put them in a glass and send to the microwave to melt. Put the power of the microwave at maximum, melt for 10 seconds. We take out the cup from the oven and thoroughly knead the whole mass in it with a wooden stick. If there are still melted pieces, then they will melt with stirring. The result should be a transparent, uniform melt.

2. Now you need to paint the base melt. To do this, add a few drops of brown dye to the melt cup and mix thoroughly until a uniform color. Adherents of natural soaps can be advised to use instant coffee as a colorant. It gives a good brown color, is natural and does not absorb other colors.

3. Before pouring the whole mass into the mold, add 2-3 drops of essential oil to it. Oil can be any, of your choice and taste. Since the cone is mainly associated with the Christmas tree and New Year, you can use pine, fir and even mandarin or orange essential oil.
4. Now we fill in the tinted and smoothed MO in the form and leave it alone for 30 minutes. But there is a slight nuance. This shape has a ribbed surface, it is very unstable on the table. In order not to hold a filled (hot) form in your hands for the first minutes while the mass is seizing, it is advisable to put it on some kind of stand.

While the soap (its brown part) hardens, you can crush the remaining MO into a glass.
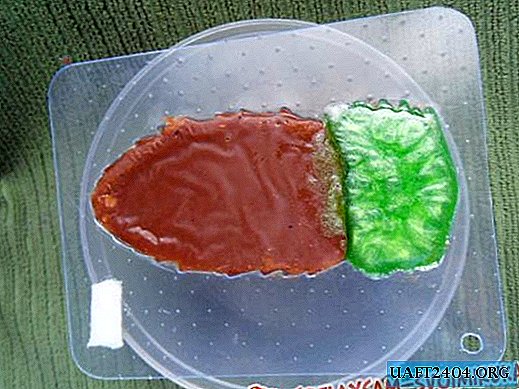
5. Now we will be engaged in carving (ie, cutting) by soap. We take out the well-frozen soap from the mold and with a knife we remove the upper part of the cone, the one where the branch should be in the picture. The cut soap is inserted back into the mold.

At the end of the cut, apply a mesh of notches with a knife. This is necessary so that the green and brown layers of soap stick together more tightly. It should be like this.

Unfortunately, with this method of making this soap, what you cut will go to waste. But cropping can then be used for other forms.
6. Now prepare the green fill. Melt the transparent pieces and paint with a green dye. If you wish, you can add fragrance to this part of the soap, although there is enough odor in the brown "bump". Before pouring the green part, the brown “slice” must be sprinkled with any alcohol so that the multi-colored layers do not break up. Fill the green slice and leave to harden for 20 minutes.
7. The soap is ready. You can take it out of shape.

For decor, on the green part with a wooden stick (like a tassel) we apply "snow" from a white MO.

We process the back of the soap with a knife, cutting off all the excess and ugly.
8. It is good to give such a soap for the New Year. To do this, make a hole with a small diameter and pass a ribbon so that the soap can be hung on a Christmas tree.

Share
Pin
Tweet
Send
Share
Send