Share
Pin
Tweet
Send
Share
Send
Let's try to repair this malfunction on our own. To do this, we need glue, an ordinary spool of thread, a piece of heat shrink tube and electrical tape.

It is advisable to use glue, which is intended for bonding fabric. But I only had the Monolith on hand. In no case should conductive adhesive be used. Of the tools you will need a soldering iron with a thin tip, flux, solder, wire cutters, a sharp knife, a lighter and a tester.
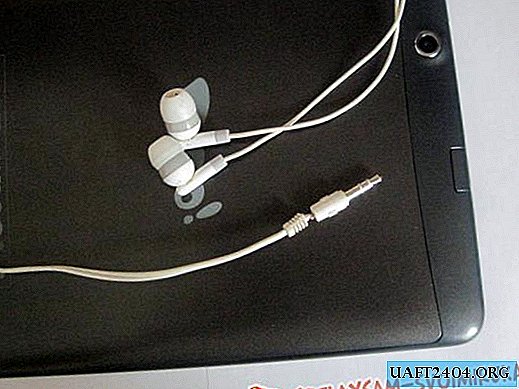
To begin, cut the wire from the plug and use a pair of pliers to remove the protective casing from it.
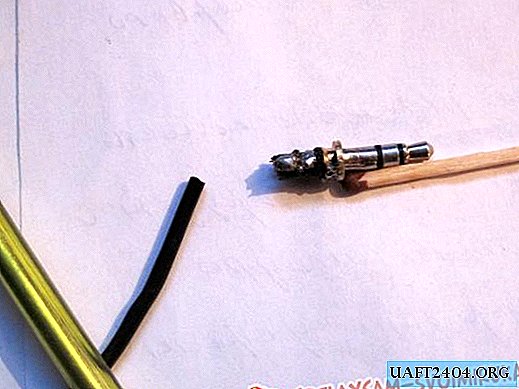
Using a soldering iron, carefully remove the remaining solder and check the plug for a short circuit. There are three pins on our plug. It is common, left and right
channel.

The tester, when these contacts are dialed together, should show infinite resistance. If this is not so, then either the “snot” is hanging from tin or the insulator is melted. "Snot" can be tried to remove with a soldering iron or file. In the second case, the plug is most likely not repairable. Have to look for another. But in our case, everything is fine and we continue to work.
We carefully remove the insulation from the wire.

Three multi-colored wires go from it to the plug. Blue, green and golden (braid). Golden is a common wire. The remaining two are the left and right channel of the headphones.

Work must be done carefully. Each core of the wire is very thin and fragile. Also, the wires are in silk insulation. The ends of the wires must be tinned (covered with tin). To do this, clean the veins with a sharp knife from silk insulation and twist together. You can try to burn the insulation a little with a lighter flame and strip it to a shine.


After tinning, we measure the resistance of the left and right channel relative to the common wire. In our case, it was about 50 ohms.

Now comes the most laborious process. This is the soldering of wires to the plug.
Before soldering, do not forget to put a heat shrink tube on the wire.
It is advisable to secure the plug somehow. For example, in a vice or with the help of any other clamp. I used POS-61 as solder, and rosin alcohol solution as a flux. On the wires before soldering, you need to wear small cambrics made from the insulation of any thin wire.

We solder quickly and accurately so as not to burn the wire and not to melt the insulators. If a drop of solder does not lie down neatly, it can be corrected with a file. After soldering, we make a control measurement of resistance. If it coincides with what happened earlier, then the work is done successfully. Otherwise, you have to do the work again. Next, at the place of soldering, we drip a little glue, not allowing it to get on the contacts of the plug and let it dry.

After that, wrap the place of soldering with a little effort and tie it to a knot. We do a control measurement of resistance. Then we impregnate the wrapped thread with glue and let it dry well.

Once again a control measurement of resistance.
And the final touch is putting the heat shrink tubing in place. It is advisable to heat the tube with a blow dryer. If not, you can try the flame of a lighter.

We do this quickly so as not to damage the wire and soldering. In the absence of a shrink tube, you can use electrical tape or tape.
After all these tricky manipulations, we make the last control measurement of resistance and rejoice (or are upset) at the result.

I want to note that the work is very painstaking. Requires a minimum skill with a soldering iron and the first time it may not work.
In this way, the functionality of many headphones was restored. You can also restore the cords of power supplies and chargers of various gadgets. In the latter case, you need to properly solder the "+" and "-".
Share
Pin
Tweet
Send
Share
Send