Share
Pin
Tweet
Send
Share
Send
I read about charcoal and identified for myself three of its main positive qualities: it burns cleaner than coal, costs an order of magnitude cheaper, and you can cook it yourself.
I looked through several instructions for self-cooking charcoal, and this method seemed to me the simplest and cheapest. Initially, I “dug” it somewhere on the Internet a couple of years ago, but in that video the guys used 210-liter barrels with pipes. I have no such steel cans or closed barrels at my disposal. How did I get out of the situation? Now I’ll tell you everything in detail.
Tools and Material


In general, we need:
- Ignition wood and charcoal wood.
- Tools for chopping and chopping wood.
- Metal container and everything you need to seal it.
What I used:
- A cordless chain saw, although a regular hand saw is also quite suitable.
- Ka-Bar combat knife for cutting fine wood, a wedge and a hammer, although you can use a knife for chopping a shingle (as in my story with making a forge, so I will make a knife for chopping a shingle from an old lawn mower blade).
- A block of wood in order to beat a knife (or a knife for splitting a shingle).
- Red oak for kindling.
- Coffee can as a container.
- Aluminum foil for container sealing.
We chop, stake and throw in a jar


I couldn’t capture everything properly on the camera, because I lost my tripod somewhere, but I think you will understand everything already.
First, I sawed off the red oak bars a little less than the height of my coffee can, then I crushed them into pieces about 20 mm thick.
I figured the thickness of the eye. Since I plan to use these coals for kindling a hearth, I thought that small bars would not work for me. If you also take into account that everything was done as an experiment with an unknown result, I needed bars with the largest possible surface area for combustion.
Then I filled the can with wood as tightly as possible, after which I covered it with aluminum foil. I made a small hole in the foil to remove moisture and wood gas.
When wood smolders in the absence of oxygen, it emits wood gas, which, incidentally, can be useful in the household. In principle, cars can even be refueled with this gas! It is because of the gases that a completely sealed container in our case will turn into a time bomb. Aluminum foil with a hole avoids this effect.
Make fire


Safety comes first!
A bucket or other container of water nearby is a prerequisite. It has been raining for 2 days, but the fire can break out suddenly and very quickly, so you need to be prepared to stop it at any second. I had about 40 liters of water on hand.
I lit the fire in a self-made steel container, which I made a couple of years ago in welding courses. I planned to make a barbecue out of it.
I have a rather long beard, and I used to shoot it already, so here is my advice to everyone who wears long beards: braid them in braids or tuck them in a shirt! I believe that a braid a la "fish tail" is a good option, while traditional braids of three strands diverge quite quickly.
For those who have long hair: Collect them from behind in a braid or in a bun so as not to scorch. Growing them up again is not so easy. My hair length does not exceed 3 cm, so this question does not bother me anymore.
So, I decided to cheat a little, using a gas blowtorch to ignite. As a tinder, I used pine shavings from my workshop, and I took dry pine beams for ignition - all this will help the red oak to flare up.
I made a fire and put an oak on top, but the fire burned weakly. The traditional method of preparing coals requires patience, but I really wanted to manage until the evening! That is why I sent a fan to the fire, and after about half an hour it completely covered the tree. It is time to move on to the next step.
We look and wait


I covered the coffee can with shelves and left the fan on to maintain a high combustion temperature.
After about 20 minutes, smoke started from the can, but it was just the evaporation of water, which I spoke about at the beginning.
After about an hour, wood gases went. HURRAH! This means that everything works as it should, and the wood turns into charcoal! After an hour or so, the fire almost disappeared, and I decided to bring a little fire to the hole in the foil to make sure that the wood gas no longer emitted. Everything is almost done!
I removed the can from the fire with the help of two rods and threw a little earth on top to completely seal the container - air should not enter there, otherwise, due to the pressure difference, it will allow charcoal to smolder further.
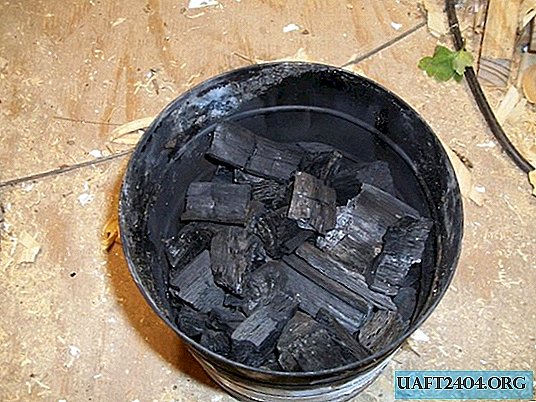
I waited about another hour, after which I opened the can and saw the finished product.
Result and Summary Thoughts


I opened the cooled can, cleaned the dirt, dumped the charcoal and broke its small pieces about 5 cm long. In fact, I just wanted to make sure that the tree was charred enough. And I was convinced of this! I got about 3 cubic liters of pure charcoal!
My thoughts on the experience:
Until I finish building my horn, I won’t be able to say for sure how good this coal is, and the material obtained will obviously not be enough. So I’ll have to repeat this process a few more times to replenish supplies.
In fact, I was surprised at the amount of coal received - after the experiment, the bank was only half full.
If you don’t have such a can for coffee at hand, but there is some free cash, you can buy a can for paint. I would recommend looking for one of those shiny metal cans that are sold in hardware stores.
I advise you to use hardwood, as they are usually denser than conifers, and during the smoldering process, so much tar and juice will not be released.
I hope you enjoyed my instruction, and I hope that someone will find it useful!
I finally finished my hearth and used the resulting charcoal. It turned out not bad - coal gives a powerful heat, while flaring up pretty quickly.
Original article in English
Share
Pin
Tweet
Send
Share
Send